
具体完整代码可以去查看我的github项目,mw-cli - 一个Nodejs脚手架工具
战斗准备
建立一个项目文件 打开命令窗口 我们所使用的一切为pnpm
npm install pnpm -g

# 初始化项目指令
pnpm init

# 安装我们所需要会用到的依赖 作用去查去查阅下吧!
pnpm add typescript  // Typescript 支持 💕 个人习惯
pnpm add commander
pnpm add copy-dir
pnpm add cross-spawn
pnpm add fs
pnpm add kolorist
pnpm add minimist
pnpm add ora
pnpm add ts-node

# 生成ts配置文件 tsconfig.json
tsc --init
启动文件
创建bin目录作为启动路径,创建index.ts文件,注意 #!/usr/bin/env 是一个常见的约定,用于告诉操作系统在运行脚本时使用指定的解释器。在这种情况下,/usr/bin/env 是一个可执行文件,它会在环境变量中查找指定的解释器(在这里是 node),并使用它来执行脚本。
# /bin/index.ts

#!/usr/bin/env node

// 引用cross-spawn
const spawn = require("cross-spawn");

// 调用pkgjson
const pkg = require("../../package.json");

// 引用commander
const program = require("commander");

// 引用创建项目逻辑
const createProject = require("../src/core/create");

//版本号 -v --version 选项
program.version(pkg.version, '-v,--version')

// 创建项目
program.command("create <projectName>").description("创建项目").action((projectName: string) => {
    createProject(projectName);
});

program.parse(process.argv);
创建项目配置文件
建立src目录,创建config目录和core目录,config 文件夹我们用于存放配置文件,core 文件夹用于存放核心逻辑文件。
config 文件夹内建立 repo.config.ts , 用于存放我们项目模板地址,原本有考虑是用github的项目地址的,但是个人认为并不适合。
# /src/config/repo.config.ts

const path = require("path");

// 模板地址
const repoUrl =  path.resolve(__dirname, "../../template");

module.exports = repoUrl;
并且创建 template 目录,存放我们项目模板
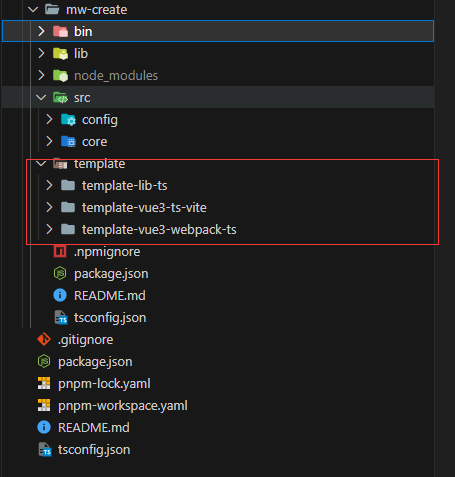
创建模板逻辑
# /src/core/create.ts

// 读取vue模版
const vueCommand = require("./vueCreate");
// 读取node模版
const nodeCommand = require("./nodeCreate");

const createCommand = async (projectName = "") => {
  const {
    blue,
    cyan,
    green,
    lightBlue,
    lightGreen,
    lightRed,
  } = require("kolorist");

  const prompts = require("prompts");

  const questions = [
    {
      type: "text",
      name: "projectName",
      message: "请输入你需要创建的项目名称",
      initial: projectName,
    },
    {
      type: "text",
      name: "projectVersion",
      message: "请输入你需要创建的项目版本号",
      initial: "1.0.0",
    },
    {
      type: "select",
      name: "projectTemplate",
      message: "请选择你需要创建的项目模板",
      choices: [
        {
          title: "Vue",
          value: "vue",
          description: blue("vue类型的一些项目模版"),
        },
        {
          title: "React",
          value: "react",
          description: blue("react类型的一些项目模版"),
        },
        {
          title: "Node",
          value: "node",
          description: blue("node类型的一些项目模,例如配置好mysql或者orm框架"),
        },
      ],
    },
  ];

  (async () => {
    const response = await prompts(questions);
    const { projectName, projectVersion, projectTemplate } = response;
    if (projectTemplate === "vue") {
      vueCommand(response);
    } else if (projectTemplate === "node") {
      nodeCommand(response);
    } else {
      console.log(lightRed("暂时只支持vue模版"));
    }
  })();
};

module.exports = createCommand;
创建vue模板逻辑
# /src/core/vueCreate.ts

interface Create {
  projectName: string; // 项目名称
  projectVersion: string; // 项目版本号
  projectTemplate: string; // 项目模版
}

// 读取vue模版
const vueCreate = async (create: Create) => {
  const prompts = require("prompts");
  const config = require("../config/repo.config");
  const {
    blue,
    cyan,
    green,
    lightBlue,
    lightGreen,
    lightRed,
  } = require("kolorist");

  const questions = [
    {
      type: "select",
      name: "vueTemplate",
      message: "请选择你需要创建的项目模板",
      choices: [
        {
          title: "template-vue3-ts-vite",
          value: "template-vue3-ts-vite",
          description: green("vue3 + ts + vite 项目模版"),
        },
        {
          title: "template-vue3-webpack-ts",
          value: "template-vue3-webpack-ts",
          description: green("vue3 + ts + webpack 项目模版"),
        },
      ],
    },
  ];

  (async () => {
    const response = await prompts(questions);
    const { vueTemplate } = response;
    // 走copy-dir 不走github了 没意义
    const copydir = require("copy-dir");
    // 进度
    const ora = require("ora");
    const spinner = ora(blue("下载模版中..."));

    copydir.sync(
      `${config}/${vueTemplate}`,
      `./${create.projectName}`,
      {
        utimes: true, // keep add time and modify time
        mode: true, // keep file mode
        cover: true, // cover file when exists, default is true
        filter: function (stat: string, filepath: any, filename: string) {
          return true; // remind to return a true value when file check passed.
        },
      },
      function (err: Error) {
        if (err) throw err;
        spinner.fail(lightRed(`项目模版创建失败`));
      }
    );

    spinner.succeed(lightGreen("项目模版创建成功"));
  })();
};

module.exports = vueCreate;
从这里整体逻辑就已经编写完了 但是我们还需要在package.json中配置一下,并且修改下tsconfig.json
# tsconfig.json
# ...
 "outDir": "lib"
# ...
修改输出目录为lib , 这样我们使用tsc命令编译后的文件就会输出到lib目录下
{
  "name": "mw-create",
  "version": "1.0.14",
  "description": "",
  "main": "./lib/bin/index.js",
  "bin": {
    "mwcli": "./lib/bin/index.js"
  },
  "scripts": {
    "test": "ts-node ./bin/index",
    "build": "node ./bin/copyDir.ts && tsc",
    "minor": "npm version minor",
    "major": "npm version major",
    "patch": "npm version patch"
  },
  "publishConfig": {
    "access": "public"
  },
  "repository": {
    "type": "git",
    "url": "git+https://github.com/itmowang/mw-cli.git"
  },
  "keywords": [],
  "author": "",
  "license": "MIT",
  "devDependencies": {
    "@types/node": "^20.4.9"
  },
  "dependencies": {
    "commander": "^11.0.0",
    "copy-dir": "^1.3.0",
    "cross-spawn": "^7.0.3",
    "download-git-repo": "^3.0.2",
    "fs": "0.0.1-security",
    "kolorist": "^1.8.0",
    "minimist": "^1.2.8",
    "ora": "5.4.1",
    "prompts": "^2.4.2",
    "ts-node": "^10.9.1"
  }
}
这里我们需要注意的是 “main”: “./lib/bin/index.js”, main字段指定了程序的主入口文件,bin字段指定了程序的命令名,npm会在全局环境下建立一个软链接,指向我们的主入口文件,这样我们就可以在命令行中使用mwcli命令了。
测试一下
npm link

mwcli create test
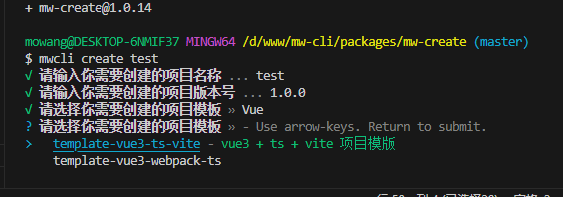
一切大功告成
具体代码参考github仓库 https://github.com/itmowang/mw-cli